搭建步骤
工具准备
1. IntelliJ IDEA(开发工具,简称idea)
2. JDK1.8+
3. MAVEN
4. mysql(数据库)
5. redis(session储存)
创建步骤
Step 1. File -> New -> Project -> Maven -> (勾选) Create from archetype
Step 2. 若tech.ibit:ibit-springboot-web-starter-archetype还没添加到系统,则需要增加Archetype;已存在,直接到Step 3。点击"Add Archetype":

archetype 信息
<dependency>
  <groupId>tech.ibit</groupId>
  <artifactId>ibit-springboot-web-starter-archetype</artifactId>
  <version>1.2</version>
  <type>maven-archetype</type>
</dependency>
填写完毕之后,点击"OK",添加成功。
Step 3. 选择tech.ibit:ibit-springboot-web-starter-archetype

Step 4. 点击"Next"进入下一步,填写对应的GroupId, ArtifactId, Version

Step 5. 点击"Next",确认信息是否需要更改
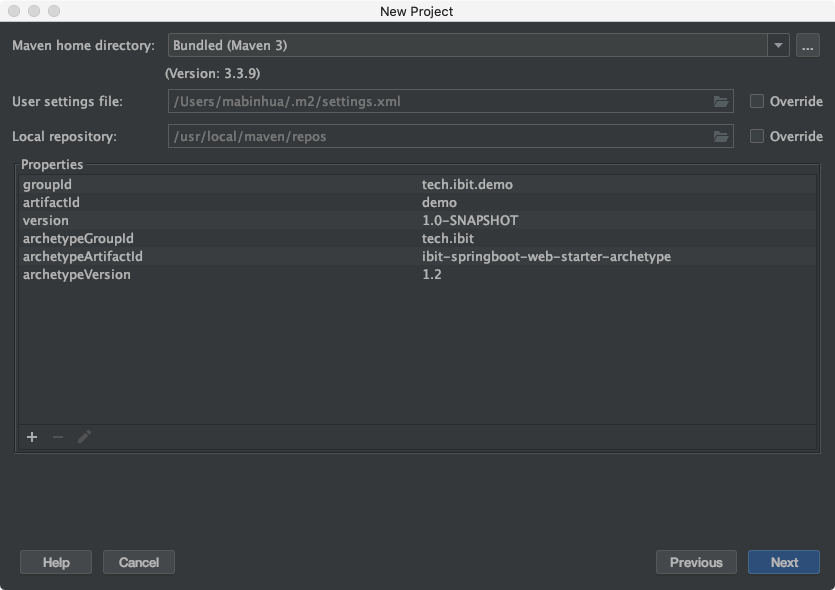
Step 6. 点击"Next",填写项目路径,点击"Finish",完成项目构建

项目结构如下(稍后介绍):

Step 7. 初始化数据库表
执行 xx-db/src/main/resources/init/init.sql,上述例子xx为"demo"
CREATE TABLE `enterprise` (
  `enterprise_id` int(11) NOT NULL AUTO_INCREMENT COMMENT '企业id',
  `name` varchar(200) NOT NULL COMMENT '企业名称',
  `gmt_create` datetime DEFAULT CURRENT_TIMESTAMP COMMENT '创建时间',
  `gmt_modified` datetime DEFAULT CURRENT_TIMESTAMP ON UPDATE CURRENT_TIMESTAMP COMMENT '修改时间',
  PRIMARY KEY (`enterprise_id`)
) ENGINE=InnoDB DEFAULT CHARSET=utf8mb4 COLLATE=utf8mb4_unicode_ci COMMENT='企业';

INSERT INTO `enterprise` VALUES ('1', 'IBIT科技', '2020-02-26 22:47:57', '2020-02-26 22:47:57');

CREATE TABLE `user` (
  `user_id` int(11) NOT NULL AUTO_INCREMENT COMMENT '用户id',
  `user_name` varchar(32) NOT NULL COMMENT '用户名,登陆用的,英文',
  `password` varchar(255) NOT NULL,
  `nick_name` varchar(128) NOT NULL COMMENT '用户昵称',
  `gender` tinyint(1) NOT NULL COMMENT '性别,0:未知,1:男,2:女',
  `mobile` varchar(32) DEFAULT NULL COMMENT '手机号码',
  `email` varchar(190) DEFAULT NULL COMMENT '绑定邮箱',
  `wechat` varchar(128) DEFAULT NULL COMMENT '微信号',
  `enterprise_id` int(11) DEFAULT '0' COMMENT '所属企业id',
  `gmt_create` datetime DEFAULT CURRENT_TIMESTAMP COMMENT '创建时间',
  `gmt_modified` datetime DEFAULT CURRENT_TIMESTAMP ON UPDATE CURRENT_TIMESTAMP COMMENT '修改时间',
  PRIMARY KEY (`user_id`),
  UNIQUE KEY `user_name_uniq` (`user_name`)
) ENGINE=InnoDB DEFAULT CHARSET=utf8mb4 COLLATE=utf8mb4_unicode_ci COMMENT='用户';

INSERT INTO `user` VALUES ('1', 'ibit-tech', '25D55AD283AA400AF464C76D713C07AD', 'IBIT-TECH', '1', '188', 'sa@ibit.tech', 'ibit-tech', '1', '2020-02-26 22:48:47', '2020-02-26 22:48:47');
Step 8. 修改xx-core下的,tech.ibit.demo.core.common.config.CommonConfig
// todo 补充"$"
@Value("{spring.profiles.active:NA}")
private String activeProfile;

// todo 补充"$"
@Value("{spring.application.name:NA}")
private String appName;
改为:
@Value("${spring.profiles.active:NA}")
private String activeProfile;

@Value("${spring.application.name:NA}")
private String appName;
Step 9. 完善xx-api的application-dev.properties,填写mysql信息,redis信息,日志信息

Step 10. 启动信息增加环境变量

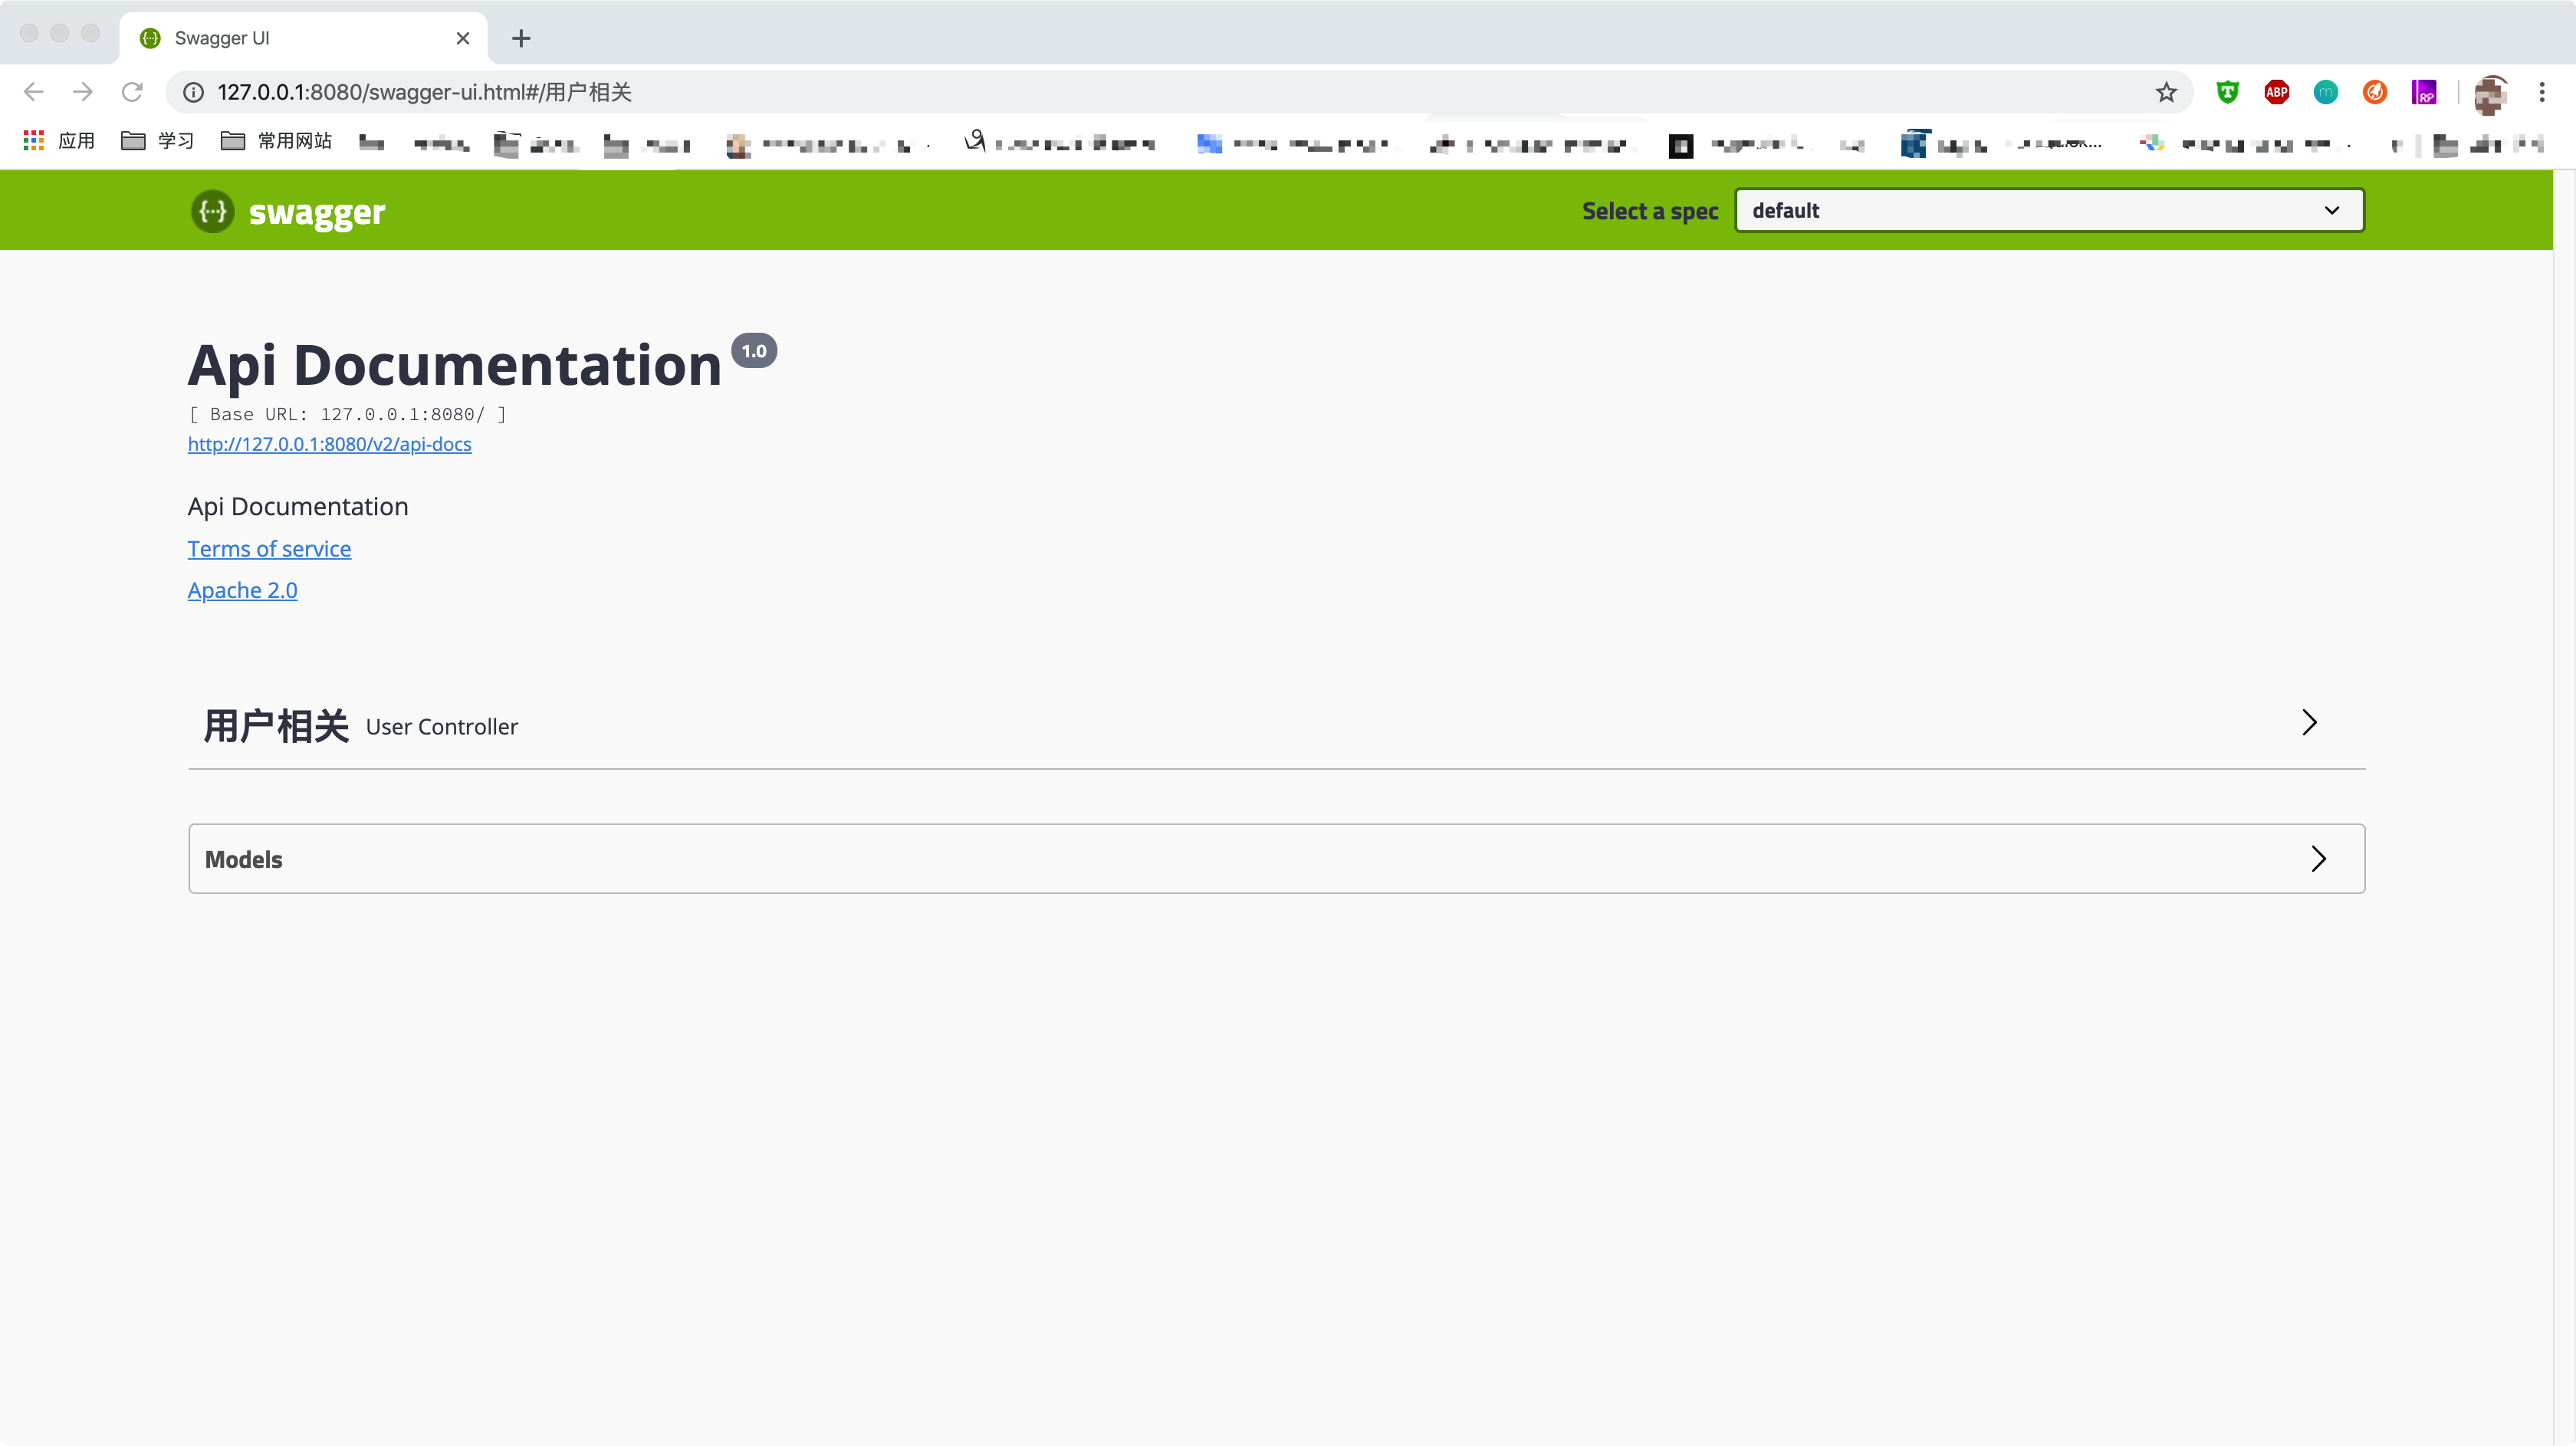
Step 11. 启动ApiApplication,浏览器中输入 http://127.0.0.1:8080/swagger-ui.html
Step 12. 测试接口,以登录为例,Step 7写入的账号:"ibit-tech", 密码:"12345678"

Done.
定义web-api规范说明
工程结构(以demo为例)
module说明
| 模块名称 | 说明 |
|---|---|
| demo-db | db基础模块(entity、mapper等) |
| demo-core | 核心业务代码(dao、service等) |
| demo-api | Controller、拦截器等 |
| log-config | logback相关配置,不直接写到api中,用来动态修改日志 |
| demo-code-generator | 代码生成器(entity、mapper、dao生成) |
代码结构说明
说明:
Gen指ibit-mybatis-generator
db模块
|-- src
    |-- main
         |-- java java代码
              |-- tech.ibit.demo.db
                    |-- entity 实体对象(Gen生成)
                           |-- po 自定义PO(字段是对应entity子集,需要包含主键)
                           |-- property 数据库表对象(Gen生成)
                           |-- type entity中定义的枚举类,需要实现接口`tech.ibit.mybatis.type.CommonEnum`
                    |-- mapper mapper对象(Gen生成)
         |-- resources 资源目录
              |-- tech/ibit/demo/db/mapper mapper对应的xml文件,(Gen生成)
              |-- db/migrations 数据库变更sql文件(集成flyway)
core模块
|-- src
    |-- main
         |-- java java代码
              |-- tech.ibit.demo.core
                    |-- common 公共模块
                           |-- config 配置
                           |-- env 环境
                           |-- log 日志
                           |-- ...
                    |-- dao 构造层
                    |-- exception 定义公共异常(系统错误码、错误码前缀等)
                    |-- module 业务层分模块
                           |-- enterprise 以企业为例子,企业模块
                                 |-- dto 定义service流转对象
                                 |-- param service层查询参数(Optional)
                                 |-- service service层
                                        |-- impl service实现
                           |-- session 会话模块
                           |-- user 用户模块
                           |-- ...
api模块
|-- src
    |-- main
         |-- java java代码
              |-- tech.ibit.demo.api
                    |-- config 配置(如session,cookie等)
                    |-- interceptor 拦截器
                    |-- module Controller模块
                           |-- user 用户模块
                           |-- ...
         |-- resources 资源目录
code-generator模块
按照demo指定生成的数据库信息,生成目录即可生成代码
返回格式定义
使用注解@CustomResponse,不使用则直接返回对象
假设Controller方法返回参数为data,则自动包装为(tech.ibit.web.springboot.response.Response对象):
{
  "code": 返回码,
  "data": data,
  "message": "返回信息描述",
  "requestId": "请求id",
  "timestamp": 系统时间戳,
  "successful": 是否执行成功
}
eg:登录
    /**
     * 登陆
     *
     * @param request  请求
     * @param username 用户名
     * @param password 密码
     * @return 登陆对象
     */
    @PostMapping("login")
    @CustomResponse
    @NeedLogin(value = false)
    @ApiOperation(value = "登录", produces = APPLICATION_JSON_VALUE)
    @ApiResponses({
            @ApiResponse(code = 200, message = "S_OK", responseContainer = "data", response = UserLoginDto.class),
            @ApiResponse(code = UserErrorCode.UserNameOrPwdError.CODE, message = UserErrorCode.UserNameOrPwdError.MESSAGE)
    })
    public UserLoginDto login(HttpServletRequest request,
                              @RequestParam(defaultValue = "")
                              @NotEmpty(message = UserErrorCode.UserNameOrPwdError.MESSAGE) String username,
                              @RequestParam(defaultValue = "")
                              @NotEmpty(message = UserErrorCode.UserNameOrPwdError.MESSAGE) String password) {
        return userLoginService.login(request, new LoginParam(StringUtils.trimToEmpty(username), StringUtils.trimToEmpty(password)));
    }
返回json:
{
  "code": 200,
  "message": "S_OK",
  "data": {
    "userId": 1,
    "username": "ibit-tech",
    "nickName": "IBIT-TECH",
    "gender": 1,
    "mobile": "188",
    "email": "sa@ibit.tech",
    "wechat": "ibit-tech",
    "enterprise": {
      "enterpriseId": 1,
      "name": "IBIT科技"
    }
  },
  "timestamp": 1582785104956,
  "requestId": "5d5ebcdd-2d32-4e86-8082-7d85fe8ec468",
  "successful": true
}
使用tech.ibit.web.springboot.response.Response自定义构造完整返回对象
    /**
     * 获取实例
     *
     * @param code      编码
     * @param message   消息
     * @param data      数据
     * @param throwable 异常
     * @param <T>       data数据类型
     * @return 实例
     */
    public static <T> Response getInstance(int code, String message, T data, Throwable throwable) {
        return new Response<>(code, message, data, throwable);
    }


    /**
     * 获取实例
     *
     * @return 实例
     */
    public static Response getInstance() {
        return new Response<>();
    }

    /**
     * 获取实例
     *
     * @param data 数据
     * @param <T>  data数据类型
     * @return 实例
     */
    public static <T> Response<T> getInstance(T data) {
        return new Response<>(data);
    }


    /**
     * 获取实例
     *
     * @param code    编码
     * @param message 消息
     * @param data    数据
     * @param <T>     data数据类型
     * @return 实例
     */
    public static <T> Response<T> getInstance(int code, String message, T data) {
        return new Response<>(code, message, data);
    }


    /**
     * 获取实例
     *
     * @param code    编码
     * @param message 消息
     * @param <T>     data数据类型
     * @return 实例
     */
    public static <T> Response<T> getInstance(int code, String message) {
        return new Response<>(code, message);
    }
异常说明
统一异常对象tech.ibit.web.springboot.exception.ApiException
构造函数
    /**
     * 构造函数
     *
     * @param errorCodeMsg 错误码与错误信息
     */
    public ApiException(String errorCodeMsg) {
        this(errorCodeMsg, null);
    }

    /**
     * 构造函数
     *
     * @param errorCodeMsg 错误码与错误信息
     * @param data         错误数据
     */
    public ApiException(String errorCodeMsg, Object data) {
        super(errorCodeMsg);
        this.data = data;

        String[] str = errorCodeMsg.split(ErrorCode.SPLIT);
        if (2 == str.length) {
            this.code = Integer.parseInt(str[0]);
            this.msg = str[1].trim();
        } else {
            this.code = ErrorCode.CODE;
            this.msg = ErrorCode.MSG;
        }
    }
其中errorCodeMsg格式为
返回码 + "__" + 错误信息
ps: 错误码定义参考core中定义的公共异常
其他说明
接口文档,使用swagger2,只会在本地、测试、开发环境启动
@Configuration
@EnableSwagger2
@Profile({EnvConstant.ENV_DEV, EnvConstant.ENV_TEST, EnvConstant.ENV_LOCAL})
public class SwaggerConfig implements WebMvcConfigurer {
     // 省略配置
}